How to fix coving
Published : 14th June 2021 in Knowledge Base
Please read all the fixing instructions carefully before commencing installation. The tools you will need:
- Mitre Block/Box
- Fine or medium tooth saw
- Relevant adhesives
- Clean Damp Cloth
- Tape measure and spirit level
- Pencil
- Hammer
- Panel Pins
NOTE: We recommend that Decorgrip PLUS should be used to fix all coving over the size of 12cm x 12cm and for all profiles on new plaster. It should also be used for all joins.
Preparation
Ensure the ceiling and wall surfaces are clean, dry and free from grease and loose particles. New or bare surfaces should be primed.
Marking out
Hold a length of coving in position using a spirit level to ensure horizontal and trace a line in pencil along the bottom edge of the piece. Repeat around the room. Then hammer a panel pin at approx. every metre along this line. Always use this as the line for taking all measurements.
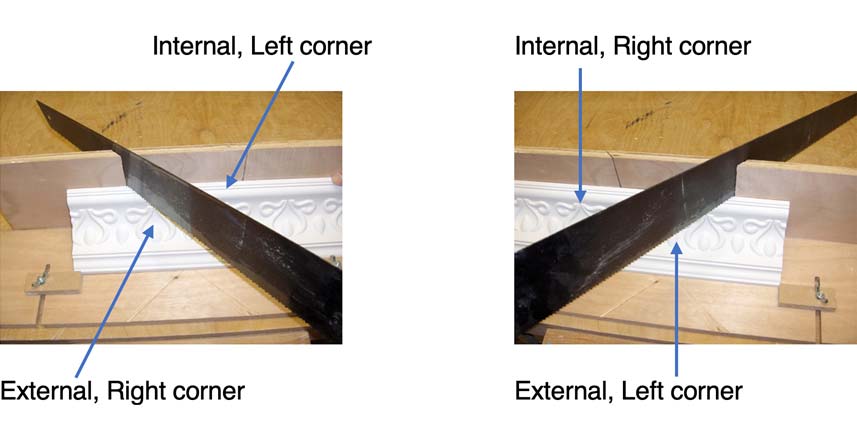
Using the Mitre Block
Understand that the vertical (back) side of the mitre block represents the wall and the flat (horizontal) base side the ceiling! According to the height and projection profile dimensions, place the moulding in the mitre block in ‘reverse’ so that the section that will be fitted to the ceiling will be nearest to you (so as the mounting point on the back of the coving is flat to the base of the mitre box). Secure the moulding with the moveable stops.
Every cut you make will produce one side (either left or right) of both an internal and an external corner. Plan your cuts carefully to minimise wastage!
Fixing
Start with the corner of the room that is most visible (it is usually easier to get the first corner the most accurate) and work round.
Be sure to use Decorgrip PLUS adhesive at joints, ensuring a good bond is achieved and for fixing all covings over 12cm x 12cm or any profiles where walls/ceilings have been plastered within the last 3 months.
Rest the coving on the panel pins and push firmly into position.
For larger profiles and/or if necessary, put panel pins vertically into the ceiling to hold the coving in position.
Also put panel pins through the top and bottom edges of the coving at the end of each length. Punch into the face of the coving and fill over the heads.
Continue fixing lengths, mitring and cutting to size as required.
Finishing the job
Fill any gaps using adhesive or proprietary filler.
Wipe off any surplus adhesive with a clean damp cloth.
Check that no detail is clogged with adhesive or filler.
The white finish of the product acts as an undercoat for most decorative paints.